react.js에서 사용
- yarn add bootstrap 진행하여 bootstrap 설치하여 부트스트랩 이미지 적용
- routes.js 파일생성하여 만들어진 page의 경로와 내용을 다음과같은 형태로 작성
import Example from "./Example";
import ShippingMain from "./shipping/ShippingMain";
import ShippingManagement from "./shipping/ShippingManagement";
import ShippingRegist from "./shipping/ShippingRegist";
import StockAdjustment from "./stock/StockAdjustment";
import StockInquiry from "./stock/StockInquiry";
import StockMain from "./stock/StockMain";
import StockReceiptNPayment from "./stock/StockReceiptNPayment";
import StockTaking from "./stock/StockTaking";
import StoreManagement from "./store/StoreManagement";
import StoreRegist from "./store/StoreRegist";

const routes = [
  {
    name: "입고관리메인",
    key: "storeMain",
    route: "/storeMain",
    component: <StoreManagement />,
    breadCrumbName: "입고관리메인",
  },
  {
    name: "입고관리",
    key: "storeManagement",
    route: "/storeMain/storeManagement",
    component: <StoreManagement />,
    breadCrumbName: "입고관리",
  },
  {
    name: "입고등록",
    key: "storeRegist",
    route: "/storeMain/storeManagement/storeRegist",
    component: <StoreRegist />,
    breadCrumbName: "입고등록",
  },
  {
    name: "출고관리",
    key: "shippingMain",
    route: "/shippingMain",
    component: <ShippingMain />,
    breadCrumbName: "출고관리",
  },
  {
    name: "출고관리",
    key: "shipping",
    route: "/shippingMain/shipping",
    component: <ShippingManagement />,
    breadCrumbName: "출고관리",
  },
  {
    name: "출고등록",
    key: "shippingRegist",
    route: "/shippingMain/shipping/shippingRegist",
    component: <ShippingRegist />,
    breadCrumbName: "출고등록",
  },
  {
    name: "재고관리메인",
    key: "stockMain",
    route: "/stockMain",
    component: <StockMain />,
    breadCrumbName: "재고관리메인",
  },
  {
    name: "재고조회",
    key: "stockInquiry",
    route: "/stockMain/stockInquiry",
    component: <StockInquiry />,
    breadCrumbName: "재고조회",
  },
  {
    name: "재고실사",
    key: "stockTaking",
    route: "/stockMain/stockTaking",
    component: <StockTaking />,
    breadCrumbName: "재고실사",
  },
  {
    name: "재고조정",
    key: "stockAdjustment",
    route: "/stockMain/stockAdjustment",
    component: <StockAdjustment />,
    breadCrumbName: "재고조정",
  },
  {
    name: "수불조회",
    key: "stockReceiptNPayment",
    route: "/stockMain/stockReceiptNPayment",
    component: <StockReceiptNPayment />,
    breadCrumbName: "수불조회",
  },
  {
    name: "예시 페이지",
    key: "examplePage",
    route: "/examplePage",
    component: <Example />,
    breadCrumbName: "예시 페이지",
  },
];

export default routes;
3. 아래와같은 형식으로 url을 읽고 routes.js파일에서 받아온 요소를 토대로 경로와 표시할 데이터 설정
import React, { useEffect, useState } from "react";
import { Link, useLocation } from "react-router-dom";
import importRoutes from "./routes";

const Breadcrumbs = () => {
  const location = useLocation();
  const routePathArr = location.pathname.split("/").filter((rpt) => rpt !== ""); //경로 dept array
  const title = importRoutes
    .filter((irts) => irts.route === location.pathname)
    .map((irts) => irts.name);

  return (
    <>
      <nav aria-label="breadcrumb">
        <ol className="breadcrumb">
          {routePathArr.map((arr, idx) =>
            importRoutes
              .filter((irts) => irts.key === arr)
              .map((irts) => (
                <li key={idx} className="breadcrumb-item">
                  {routePathArr.length - 1 == idx ? (
                    <span>{irts.breadCrumbName}</span>
                  ) : (
                    <Link to={irts.route}>{irts.breadCrumbName}</Link>
                  )}
                </li>
              ))
          )}
        </ol>
      </nav>
      <h3>{title}</h3>
    </>
  );
};

export default Breadcrumbs;
4. jsx형식으로 js파일 import
return (
<>
<HeadLink />
<div className="card">
<Breadcrumbs />
<Routes>{getRoutes(routes)}</Routes>
</div>
</>
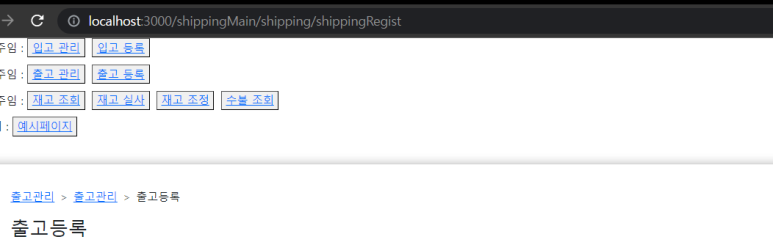
);5. 결과확인
'react' 카테고리의 다른 글
| React - grid 데이터 특정값의 합/count 구하기(reduce, callback) (0) | 2024.08.02 |
|---|---|
| SpringBoot - React CORS Error 해결 (0) | 2023.05.24 |
| 페이지 인쇄 구현 (0) | 2023.05.16 |
| react 전체 선택/해제 구현 (0) | 2023.05.16 |
| 네이버 스마트에디터(2.0) 사용하기 (0) | 2023.05.16 |